A few things we want to just note.
Before you choose the first conversation, in the simulator window, look underneath the simulation screen. This is where all of the variables you have in your entire project that are available in the LUA scripting language. You don’t normally need to do anything here, just take note of them. For example, here we will find the Weapons item, then the fields we have access to in the scripting language such as Name, Inventory field we defined. Sometimes you can debug problems by looking at this.
Simulating the conversation, notice how on the left side in the Mutual Status tracker, the one we set “Actor Charlene toward location Great Cave, learned about. Clicking where we talk to the actor protector, weapons in the inventory, equals true.
We will add a node to the person that actually has the amulet. Make a New Conversation called The Cave, between Charlene and Hanatu, the person that has the amulet. For the new conversation the amulet conversation will be renamed to The Village. Notice how the conversation opens up in a new tab which makes it easy to switch between them. Now fill in the conversation between your two actors. When our actor gets the amulet we will make that happen in the script editor. Go to assets, drag in the amulet asset, type 1. Item [“Amulet”] .InInventory = true. This is actually the action of receiving the amulet.
Now we will go back to The Village and we will add to the protector’s dialogue text, something like “When you get the Amulet, come back and talk to me.” That prompts the player that they are supposed to go back there. Now add one last option to the Node where any time you come back, we will add a third node there that will be for when the player returns and actually has the Amulet. So we will have the Protector if you actually have the Amulet and you come back, says something like “I am pleased that you finally completed your task”. Save that.
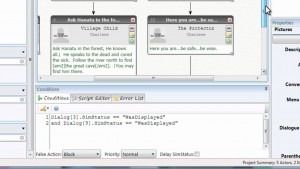
The condition for this node is going to be (drag the amulet in the conditions box underneath)
Item[“Amulet”] .InInventory == true as a condition. Because we set a below normal priority, previously to the node that tells the player they should return once they have the Amulet, the new node will be higher priority so that will be chosen first. Now we simulate the work. Notice both conversations appearing in your simulator window. Choose the first conversation, talk to the child, the protector then leave, choose your second conversation, go to the cave, actor gets the Amulet. Now in Variable Tracker, we will have “I” for Item, I[Amulet].InInventory = true ; “V”[variable] = 100 ; “I”[Weapons].InInventory (note the x on the right side of each of the above, you can remove any of them at any time).
Now, if you don’t want all the conversations to be available at the very beginning. So we will set a condition on the root node of the conversation. So the condition here is going to be a Mutual status, so that will determine that the node will only be displayed after Charlene has learned about the Great Cave so after completing a or the task.
GetStatus(Actor[“Charlene”], Location [“Great_Cave”]) == “LearnedAbout”
The last thing that will demonstrate the power of the scripting system is to do a relationship between nodes. So in our example, in the cave we will allow Charlene to be really mean to this guy. We will select the previous node, written here, we will name the dialogue “Be nice” and we will add a Group to keep things organized. We can insert a New Group before a node. We will call this Nice/ Mean, color it Orange. This is where we will make a second option. Actor Charlene talking to Hanatu, Menu Text: Be Mean and Dialogue Text: Give me the Amulet!| I know you have it, old man! Save that.
The response to that will be “I see you are of mean spirit | This Amulet will give you what you deserve.
For the Menu text “I see you are of mean..” Actor Hanatu and Conversant Charlene.
To make this work properly, when you choose this option “Give me the amulet” , the mean option we will have the script editor set to Decrement Relationship (You can define whatever arbitrary type of relationship you want to track, they all start at zero), so if we decrement with the decrement relationship function. After this node it will be (“-1”) negative one. Actor one in this example will be Hanatu and actor two, Charlene. This will be the way Hanatu feels about Charlene and the “the type” will be “friendly”, decrement by 1.
DeRelationship (Hanatu, Charlene, “friendly”, -1)
We still want to give the amulet even with the decremented relationship, so we will copy and paste the condition of the Amulet being given even to the negative choice of dialogue.
Now we need a way of responding to that choice. Back to the first conversation we will add in a new Insert a New Group” before “I am pleased” and we will call it “Nice/ Mean” as well and color it Orange. At the nice response :I am pleased you have completed your task”, we will transfer its condition , cut it and paste on the Nice/ Mean group node. Let’s add another response: Protector talking to Charlene, which means the actor is The Protector, and the Conversant, the person spoken to is Charlene.
So if Charlene is mean to Hanatu before, we will have The Protector say something like “The energy of this Amulet is dark. | It appears that Hanatu has cursed the Amulet. | What have you done?!” The way the player will respond correctly is by using the Relationship Condition. So the condition will be a relationship condition, Hanatu, towards Charlene, and the type will be “friendly “ and the value needs to be grater or equal to zero.
GetRelationship (Actor [“Hanatu”], Actor [“Charlene”], “friendly”) >= 0 (this is for the nice response path).
We will copy the same condition to the negative response path, but it will be displayed only if the “friendly” relationship is less than zero. Simulate.
Notice that “The Cave” conversation is grayed out, which means it cannot be accessed until the first conversation has been completed. Completing the first conversation will take the player back to the main menu, choose conversation number two, go through that and choose the “Be mean”. Going back to the Village, we will see the Nice/ Mean path being the dialogue followed as a result to Charlene being mean.
We hope this video tutorial is useful and you learned some of the various ways you can use the scripting system to make your conversations more robust and flow exactly the way you want them to. In the next video we will actually present you with even more tips and tricks and some comment structures that might useful for you in your conversations.
 Chat Mapper Tutorial (Scripting) Part 1 of 2
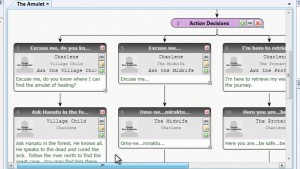 Chat Mapper Tutorial (Basics) Part 1 of 2
 Chat Mapper Tutorial (Basics) Part 2 of 2