Hi everyone, this is Eve from Chat Mapper and I’m going to give you a brief tutorial on how to use the basics of Chat Mapper.
I’ve come up with the basic story that I want to show you, how to create the tree for.
The first thing I’m going to do is create the actors. You will notice here there are two characters already built in, its defaulted, for any new project we have a new player and new NPC.
New player will be with the main character the person that the player gets to play as and on the Properties panel I can fill in information for that character so the main character’s name is going to be Charlene. She’s age 26. Gender female. Notice that this player box is checked. That means that this is the playable character and most likely the main character.
The next thing you’re going to do is add the first and NPC and just as with the new player enter their name. This is going to be the village child. And I’m going to leave this unchecked to show that this is an NPC.
To confirm the changes I’ve made all I have to do is click outside the field and it’s confirmed. You’ll see the change updates in the assets panel.
To add new characters just click the drop down arrow then select new actor and notice that something that is a lot like the Properties panel just pops up automatically. That just makes it really easy to create new characters. This is my second NPC. Click ok and there you go, one more actor. And now we have everyone for my story.
Other assets include items, locations and variables.
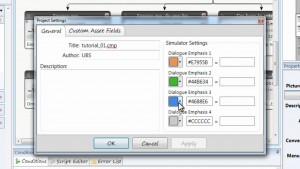
Before I go further I want to make sure I name my conversation. Click the conversations tab and just like the assets click the item and then rename. Click outside to save.
The next thing I’m going to do is build the tree. This is where I create my notes and map everything out.
What else do we see in the Chat Mapper editor?
– assets in conversations panel.
– this is the conditions script and error list area.
Select any of the tabs to see their content and how you can use them to edit your conversations.
Other items include the Properties panel, and our overview. The conversation overview is like in other image manipulation programs where we can drag around the box you can navigate through the conversation easily.
The first thing I’m going to do is add an introduction node that is going to present our problem, it’s going to be the basis for the rest of the tree.
Click the green button on the node and what I’m going to is Charlene basically talking to herself. That’s how she is going to present the problem to the player. So she will say something like “The chief said the amulet is somewhere in this Village, but where could it be?”
The menu text is what the player would see if there were menu options but in this case Charlene is just thinking to herself, nothing to click so we will just leave it blank.
Other items are, the title and the area that is for the writer, the developer, whoever is creating the tree, to keep track of which node is which.
The actor is the person who is speaking and the conversant is the person who’s listening. As my character is thinking to herself she is both. Click okay and that creates our first node.
Very exciting!
The second thing I’m going to do is create a group and that’s basically a reference point.
To create a group I just click the folder in the dialogue node, name it, in this example it will be called Action Decisions. After you’ve named it, click outside to confirm and another thing I like to do is color code my group. So this area here above the chat tree area, is where the highlighters are.
I’ll choose purple and now from this point I can create all my different branches. To do that click the green button and I can start filling out my text. After I filled up all my information, I have my dialogue text, the menu text that the player will see in the simulator, the text for me to see it within the dialogue tree, the person who speaking and the person who’s listening. Click okay and I have my first branch. Now if I wanted to add a second part to this I just click the green button and notice that the actor and the conversant have switched that’s because Chat Mapper is expecting a response.
I’m just going to use these methods to fill out the rest my four dialogue branches, the last one being the leave option.
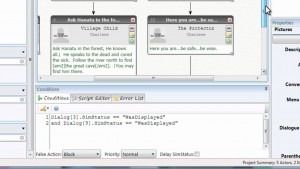
The problem here is let’s say the player clicks this node and then continues down the branch, what happens is there’s nothing that tells the program to go back to the Action-Decision group. So what we have to do is create a link between the two dialogue nodes. To do that I click the link button, you can see this node is highlighted and then click the node I want to link to. That tells Chat Mapper that when we get to this node and the players clicked it to go back to two which is our group.
Now we will link the rest of them dialogue nodes. But since I want to be able to end the conversation at some point I’m leaving my “leave” option with no link. The next thing I want to do is reorder my branches but say I don’t like the way it shows up in the simulator and I want the order to change.
Right click the dial on node and click reorder note left or right in this case I want to go to the left.
Notice that the the numbers remain the same so everything that is associated keeps its relationship.
The next thing I want to do is add action tags and what that does is makes italics in the simulation.
It just makes your conversation look a little nicer.
I’m just going to add the A tag to the rest to dialogue nodes. Now in the simulation the 4 options will appear in italics.
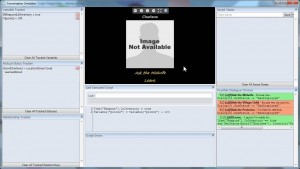
Now let’s simulate the conversation we have. The green bars show all the valid possible clickable nodes in the simulation. Here are our four things, this is basically a decision group. You can press escape to toggle through them faster. Everything seems to be working. And there we have it. So now let’s go back to our tree.
There are a couple problems with that dialog simulation, for one thing you could click each item endlessly, you can keep clicking “midwife”, keep clicking “village child” and it doesn’t stop until we click leave but I don’t want the player to be able to leave until they’ve got the information they need. For example the village child is the character that tells the player where to go and the protector is the person who gives the player the weapons to go on their journey so we don’t want to leave option to be available until those two conditions have been met.